
A physical/digital playful learning environment for a New Mexico Historic Site
Jonathan Lee, NMHU, USA, Simone Seagle, New Mexico Highlands University / Cultural Technology Lab, USA, Miriam Langer, New Mexico Highlands University, USA
Abstract
In the spring of 2015, an advanced exhibition design class from New Mexico Highlands University's Media Arts & Technology Department redesigned the visitor's center at Coronado Historic Site in Bernalillo, New Mexico. Kuaua Village was a first-contact site between the native population and the Spanish entrada that was moving up the Rio Grande valley from Mexico in 1540. The redesign featured, among other updates, a new interactive "Sim" pueblo in which three-dimensional-printed pieces are placed on a responsive iPad to reveal information, animation, and clues to life in the ancient village. That project was reenvisioned using the HP Sprout, a device designed to scan two- and three-dimensional objects and then add them to a library of usable objects on a touchscreen and projected mat. For this demo, we will show the HP Sprout detecting individual printed objects, which are then made responsive as physical or digital objects. By moving the prints on the mat, puzzle pieces are unlocked on the touchscreen, and animations of pueblo life are added to the projection. Information about life in the pueblo from architecture, construction materials, pottery traditions, and agriculture is revealed.Keywords: cultural technology, native american, pueblo, southwest
1. A brief history of the Kuaua Village
In 1540, while searching for the Seven Cities of Gold, Spanish explorer Vasquez de Coronado came upon Kuaua Village in what is now northern New Mexico. Coronado Historic Site, although named for the explorer, is today the site of the ruins of this village. At the time of its discovery by Coronado, the village was already generations old (estimated foundation ca. 1325), but it would soon be abandoned forever. Kuaua was one of twelve Tiwa villages in this area. Coronado chose to spend the winter of 1540 here, and tensions soon rose between the indigenous people and the explorer’s party. The stay culminated in the Tiguex War between Coronado’s men and several of the surrounding Tiwa villages near what is now Albuquerque. The lasting effects of the war and subsequent missions are believed to have led to the abandonment of this group of villages less than a century after Coronado’s arrival. The Tiwa people moved elsewhere and still reside in Taos, Picuris, Sandia, and Isleta.

Figure 1: aerial view of Kuaua ruins, circa 1940
In the 1930s, archaeologists Edgar Lee Hewett and Marjorie F. Tichy led an excavation of the site, discovering a series of pre-1492 murals from the pueblo’s southern kiva. Fourteen of these murals have been restored and are displayed in the Coronado visitor’s center. Prior to these excavations, Hewett was instrumental in crafting the Antiquities Act and served as the first president of New Mexico Normal School (now New Mexico Highlands University).
In 1940, Coronado Historic Site became New Mexico’s first state historic site. Many of the excavated rooms from the village had to be filled in again to preserve their fragile state. A visitor’s center designed by noted Southwest architect John Gaw Meem stands near the buried ruins today, giving visitors a glimpse at the past around them.
2. Redesigning the visitor’s center
In the spring of 2015, an exhibition design class from New Mexico Highlands University’s Media Arts & Technology Department redesigned the visitor’s center. Among other updates, an interactive Sim pueblo was introduced. In this interactive, visitors can place 3D-printed models of pueblo structures onto the iPad surface, allowing them to build up the village as they wish using pieces of various size. Each piece placed onto the screen will register with the application, and corresponding information about the village through its centuries of growth will be presented to the user. The is to allow the user to control the growth of the pueblo and learn about the actual history of its growth at the same time.

Figure 2: redesigned visitor’s center panels
The iPad app was a success but did not align to the original vision. In the summer of 2015, Craig Cassidy, the lead designer of the iPad interactive, teamed with Simone Seagle to address the shortcomings and revisit the project with a new, promising technology.

Figure 3: Sim Pueblo iPad app in use at the visitor’s center
3. iPad limitations
We identified a lot of user-interface constraints on the iPad version of Sim Pueblo. First and foremost were the hardware limitations of the iPad, both of its size and of the way the buildings were originally detected.
The physical size was an issue for the iPad because the buildings, while printed very small, still took up most of the screen, leaving only one small sidebar for the educational content. When visitors were building the pueblo, their arms would cover the small area of the screen where information about the pueblo was being displayed. Often they would miss the text entirely.
One of the biggest limitations was that the iPad could not produce true object recognition. The iPad uses a capacitive touch screen, which means something that can disrupt the electromagnetic field created by the device (such as a finger) can be tracked as it moves across the screen by sensing where the field is being disrupted. The plastic piece alone will not disrupt the field to be sensed by the device. The app team decided to extend the field from the user’s finger to the piece by affixing a copper girdle around the plastic piece, but a building would only register as a touch while a visitor was holding it by this girdle. Therefore, even though the iPad has eleven simultaneous touch points that it can register, the app was only using one touch point throughout the entire cycle of the user placing buildings on the app. This posed a number of problems:
- The iPad did not know which, if any, buildings were placed on the screen, let alone have any continuous feedback about which buildings were placed where.
- Because touches could not be distinguished from one another, the iPad would simply tally them up and then cycle through the information on the sidebar. Therefore, a visitor could also simulate the addition of a building to the screen by putting the same building down twice, or even simply by tapping the screen.
- The small size of the working area made it increasingly difficult for a visitor to hold the building by the copper girdle as more and more buildings were added to the screen.
- Because touches did not persist after a user’s hand was removed from a building, there was no way to know if buildings were removed from the screen, and if someone touched the copper girdle while removing a building, it would actually register as them having just placed a building.
- Because of the tallying of touches and impossibility of detecting building removal, the app needed a reset button that had to be pushed before beginning anew, even if all buildings were removed from the surface.
These problems inherent in the hardware made it obvious that the only way to drastically improve the interactive was to move to a different platform entirely.
4. Goals for Sim Pueblo 2.0
In order to combat the usability issues with the iPad implementation, we came up with a set of goals to meet with the new version:
- Bring educational content to the forefront of the interactive.
- Allow for physical building identification and tracking in real time, regardless of user contact, with minimal adornment of the pieces.
- Create a model application that could be extensible enough to use for all of the New Mexico Historic Sites with a minimum of modification (that is, same general format, different assets). This includes both a simple UI structure and out-of-the-box hardware that can be purchased and set up easily.
The remainder of this paper is an exploration of how we strove to meet these goals.
5. Hardware consideration and selection
In order to really improve the Sim Pueblo interactive over what was available in the iPad version, we had to select a completely different hardware platform. We considered three main options.
First, we considered building a custom solution with a computer, a 3D camera like a Leap or a Kinect, and a touchscreen. This would be very cost effective, somewhere on the order of $1,000 total, but could be difficult to maintain long term because there is minimal support available for the end user. Furthermore, without out-of-the-box hardware, it could be difficult for future developers to recreate the model solution for other historic sites.
The second idea was to buy a touch table. Touch tables allow for a large working area, a built-in computer, support from the manufacturer, and a large number of available touch points. This path was ruled out for two reasons: first, the price was prohibitively expensive (approximately $8,000 for an appropriate table); and second, the vast majority of many-point touch tables are also capacitive touch like the iPad. Therefore, it is not obvious that they would have solved the original problem of only recognizing buildings while they were being held.
The third option, and the solution that we settled on, was to use an HP Sprout. The Sprout is an all-in-one PC that includes a touch screen, downward-facing webcam, downward-facing Intel RealSense 3D camera, and touch mat with projected imagery. This is a reasonably priced (approximately $1,900) out-of-the-box solution that comes with the support and warranty of a name-brand manufacturer in case of hardware issues. It also allows for the monitoring of 3D objects on its mat and has a second screen that can be used solely for educational content.
6. Sim Pueblo user interface and experience
Moving to the Sprout solved many of the most egregious problems of the iPad implementation. The physical area available to build a pueblo was effectively tripled (a twenty-inch diagonal compared to an approximately eight-inch one). This allowed us to 3D print a new set of pueblo buildings at three times the iPad size, making it easier to see the detail on each one and also making them easier to hold. Furthermore, the buildings no longer had to be fitted with a copper girdle and touch point, so they were simpler to produce.

Figure 4: 3D print for iPad (left); the same building for the Sprout version (right)
The addition of a second screen gave us much more flexibility to improve the flow of the interactive and information display. The educational content that we received from the Coronado monument did not have a 1:1 correlation with each building, and it also was not completely chronological. This led to the idea of having a visitor recreate the experience of living in the pueblo by rebuilding it like a puzzle. Each building is associated with one piece of a beautiful historical mural provided by the monument depicting puebloan life.
As buildings are added to the gameplay area, mural shards are added to the upper screen, displaying text and an image if applicable. When the user is done reading the content, he or she simply closes the shard and it flips over, showing part of the mural, and pops into place.
Each shard also has a set of small, unique interactive assets that can be added to the pueblo workspace below, bringing it to life. For example, one shard has facts about pueblo agriculture and allows you to add corn, beans, or squash to the building area. That way, even if the visitor follows the map of the original pueblo layout, her or his solution will not look the same as any other visitor’s.
Once all buildings are added, the mural is complete, and visitors have seen all of the relevant information.

Figure 5: simple diagram of Sprout UI
7. Sprout software development and platform limitations
The HP Sprout Software Development Kit can be used with C++, QML, C#/WPF, or JavaScript. Our first attempt used the JavaScript application program interface (API), as it is a commonly used Web language and would be easy to build in, for both us and future developers who may join the project. Unfortunately, as it stands now, not all Sprout capabilities have been exposed through the JavaScript API. Many more capabilities are exposed to the CLR Binding, so after some experimentation with JavaScript, we moved to C#/WPF.
The Sprout boasts real-time object tracking on the touch mat, but unfortunately the only objects it can track continuously at present are 2D (e.g., photos or documents). Even though our buildings have one preferred orientation, we were unable to use the built-in object tracking for them. Learning how to track them properly has turned out to be by far the most difficult part of the project.
In the Sprout SDK, the Capture method allows the developer to get full the full 3D information available in a scene, but this takes on the order of five seconds and causes the whole mat screen to go blank. Therefore, it cannot be used to track the buildings and still allow for a satisfying user interaction.
The Sprout itself uses the Intel RealSense 3D camera for its 3D sensing, and it occurred to us that perhaps we could use that to track the objects on the mat. However, even though the camera has its own SDK, that SDK is not exposed to developers on the Sprout, possibly because it could interfere with the functioning of the Sprout during object capture. There is no word on whether the ability to access that camera directly is something that HP will ever release to developers. (Sprout Developer Forums)
The most robust way we found to identify and track the buildings was to use the built-in downward facing webcam with extensive image analysis.
8. Object tracking methodology: Two approaches
Based on the archaeological information of the site, we took the original configuration of the pueblo and split it into nine different buildings. The goal of object tracking would be to compare the configuration of buildings on the mat and give the user constant feedback about where they have located the nine pieces.
We used the AForge.NET image-processing library to filter the image from the downward facing webcam. Each frame is enhanced using a series of filters designed to bring out the relevant visual information in each frame. The image’s colors are modified, contrast enhanced, converted to grayscale, and finally converted to a simple black-and-white image by a threshold binary filter. This takes a full-color video frame and turns it into a black-and-white image with all relevant parts highlighted and ready to process. The processing is so fast that it creates virtually no lag whatsoever, a key component of our goal for ideal user interface.
So while we had a very effective method to get data from the webcam, we needed a way to turn that data into an accurate map of the physical buildings on the mat.
Note: for all subsequent figures in this section, the left portion represents the raw webcam output and the right portion shows analysis superimposed on the filtered image.
Outline polygon approach
The buildings that we are working with all have unique outlines and sizes, which originally led us to explore polygon-matching algorithms based on the outline of the building as seen from above. The polygon outline was easy to extract with a Moravec corner detection algorithm combined with a blob detector. We explored the idea of using a turning function to identify buildings by outline.
Figure 6 shows the polygons of the buildings when they are separated from each other. The right side shows the filtered image in black and white with building blob rectangles in blue, building outline polygons in green, and numerical guesses for building identity in peach on each blob. The algorithm guesses the identity of the building by area and is almost always correct, although it cannot determine rotation.

Figure 6: webcam output (left); analyzed image with polygon outlines and guesses as to which building is which (right)
Unfortunately, once buildings touch, the robust algorithm breaks down fairly quickly. You can see in Figure 7 that the large collection of buildings is no longer identified properly, and the polygon point-sorting algorithm becomes unstable as the points are no longer concentric around one central point of the building.

Figure 7: webcam output (left); same algorithm as Figure 1, but with buildings in contact (right)
Unfortunately, even though this approach was very promising at first, it is not likely to be a solid production solution. To reiterate the issues, each building polygon contains roughly one hundred to three hundred points, and sorting them gets more complex as the number of points increases. This complexity increases again once we have more than one physical building making up a polygon in the analysis, and as the complexity goes up, speed goes down, taking away from our goal of instantaneous user feedback.
Fiducial triangle approach
The next idea was to put identifying markers on the building. We settled on using contrasting green dots with three dots per building. That way, buildings can be identified by a unique triangular constellation of dots. This is not a perfect solution, because the buildings are now adorned and not exactly historically accurate, but this provides us with a reliable and very fast way of tracking the buildings.
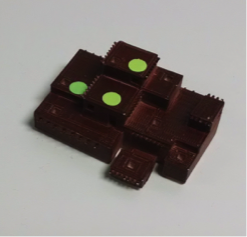
Figure 8: 3D-printed building, spray-painted brown with green fiducial dots on top
Three dots were selected for the ID process, because triangles are the simplest geometry that can still be reliably located and oriented. An example of that analysis is shown in the following image.

Figure 9: Sim Pueblo debug window (raw video on left, processed on right)
The image-filtering method is slightly modified for this approach in order to bring out the fiducial dots, rather than outline of the buildings. The window shown is an optional video debugging window in Sim Pueblo that can be turned on and off in the configuration of the program, allowing for easy error finding for staff.
After the frame is converted to a binary black-and-white image, we use two instances of blob detection processor from the AForge.NET library. The first blob detector goes through and locates blobs of the size of the fiducial dots. These are seen as visualized as orange rectangles above. A second blob detector (not shown) isolates the buildings from their background and is used to filter out unwanted blobs from the first set, allowing us to discard false points like those shown in the upper left corner of the processed image in Figure 9.
Once the array of viable blobs is pared down, they can then be arranged into all possible triangles (visualized in blue above). Each triangle is compared by side length with the database of triangles for each building. When a matching building is found, the triangle is analyzed for location and orientation on the map. The new location and orientation is compared against previous data in order to prevent false positives. When a building is verified as being truly present on the mat, that data is sent to the controller for the mural shards and the building tracker on the screen.
9. Usability limitations
Because the 3D-printed buildings are historical recreations of the actual pueblo, they allow for tactile exploration by the vision impaired. Unfortunately, we do not have the budget at present to have someone read and record the accompanying text that goes with the buildings, so the vision impaired would not be able to fully participate in the game.
We do not yet have a Spanish translation of the text, which would be an excellent edition because New Mexico has a high proportion of native Spanish speakers.
The fiducial dots are a robust and simple solution to building tracking, but are not ideal in terms of historical accuracy. All future 3D prints must be spray-painted the exact same color, and care must be taken to apply the dots in exactly the same locations, which could pose problems. We expect to make backups of all the buildings anyway, because while they are not exactly delicate, they can be destroyed by serious mishandling. For example, one of our dogs got a hold of one building and mangled it in seconds.
10. Conclusion
The current implementation of Sim Pueblo does an excellent job of meeting the goals set out at the beginning of the project, although it does have room for improvement.
Educational content is now prominently displayed during the user experience. The physical experience of using the interactive matches how a visitor uses a typical computer, where the physical manipulation is below and information is displayed above. Therefore, the overall user experience should be intuitive and successful.
Video-frame analysis is fast enough that there is virtually no lag between a user’s interaction and what is displayed on screen. The only lag is when a user’s hand is directly over a building, but persistence is built in to prevent any glitches, such as the program thinking a building was removed when really it was just blocked by a hand. However, a large number of hands blocking the webcam could become a problem that may need to be addressed.
The 3D-printed buildings are adorned with the green dots, slightly detracting from our second goal, but we are now in the process of experimenting with infrared markers that would be picked up by the Intel RealSense camera.
Finally, the program we have built can serve as a model for other New Mexico Historic Sites, and possibly other museums as well. The method for tracking of 3D objects with triangles would be robust even if a historic site has many buildings that have the same shape. New assets and information could easily be swapped out in the code. 3D models would have to be recreated for each site and then 3D printed. It is also possible that a new paradigm would have to be used to replace the mural building idea, but that change is easy compared to determining a new method to track the 3D models.

Figure 10: Sim Pueblo interactive in its current form
Cite as:
Lee, Jonathan, Simone Seagle and Miriam Langer. "A physical/digital playful learning environment for a New Mexico Historic Site." MW2016: Museums and the Web 2016. Published February 13, 2016. Consulted .
https://mw2016.museumsandtheweb.com/paper/a-physicaldigital-playful-learning-environment-for-an-nm-historic-site/